The purpose of this document is to outline how Lift AI’s integration with Google Analytics (GA) works alongside some of the key benefits to your business.
Are you still using GA3 instead of GA4? All accounts from July 2023 onwards should be using GA4, however, GA3 instructions can still be found here if needed.
Key Benefits
1) Full visibility of your website visitors’ buyer intent scores if they do not opt out of analytics tracking
2) The ability to cross-reference any GA reporting segment with Lift AI buyer intent scores.
Google Analytics is a powerful tool that enables you to see:
- Traffic Sources
- Audience Demographics
- User Behavior
- Mobile usage
- Conversion (or eCommerce) tracking
- Site Performance
With the Lift AI integration, you can now slice all these views by the Buyer Intent of the visitor. For Example, which traffic sources or audiences generate a higher % of High-Intent Visitors, or which pages are High-Intent Visitors consuming the most and more?
3) Ability to combine Lift AI buyer intent data to any other system you have integrated with GA.
This allows you to get feedback on the quality of traffic in key areas so you can take steps to accelerate your engagement with high buyer intent visitors while nurturing, supporting, or even filtering out low intent visitors from key sales or marketing processes.
For example, you may prioritize visitors who complete a contact us form if they are high intent versus low, or you may get a salesperson engaged in live chat if the visitors is high intent versus a chatbot for low intent.
What is different in GA4?
Lift AI offers integrations with both GA3 and GA4, so you can use both at the same time if necessary until you have completed your GA4 migration. This document is divided into 2 parts to reflect the integrations for each of them.
Google Analytics 4 (GA4) is the latest version of Google Analytics, which was released in October 2020 and is also known as GA4 or Google Analytics for Firebase. It is a completely redesigned version of the previous Google Analytics (GA3) with a focus on app and mobile analytics. The main difference between GA3 and GA4 is the approach to data collection, analysis, and reporting.
Here are some key differences between GA3 and GA4:
- Data Collection: GA4 collects data in a more granular and flexible way, providing deeper insights into user behavior. It also collects data from multiple sources including websites, mobile apps, and IoT devices.
- User-Centric Approach: GA4 uses a user-centric approach to tracking user behavior, which provides a more complete picture of user engagement and conversion.
- Machine Learning: GA4 uses machine learning to identify patterns and insights in your data, providing automatic and predictive insights.
- Event-Driven Architecture: GA4 is built on an event-driven architecture, which allows it to process large amounts of data in real-time and provide real-time insights.
- Real-Time Reporting: GA4 provides more advanced real-time reporting capabilities, enabling you to see how your campaigns and website are performing in real-time.
- Integration with Firebase: GA4 is integrated with Firebase, Google’s mobile development platform, making it easier for developers to implement and use.
- Data Privacy: GA4 includes privacy-focused features, such as the ability to limit data collection and control data retention.
In conclusion, GA4 is a more advanced, flexible, and powerful analytics solution.
What does Lift AI send to Google Analytics?
The data that Lift AI sends to Google Analytics is used to help website owners better understand their visitors and make informed decisions about how to optimize their website and their sales and marketing programs.
We do this by tagging each individual website visitor with a ‘Buyer Intent’ score, then passing that score into an ‘event’ in Google Analytics.
In addition, Lift AI can pass our unique “Anonymous Visitor ID” to Google Analytics. With this ID, you may be able to connect the information you have about these visitors in GA with information you have about these visitors in other systems.
GA4 Integration Guide
Step 1: Authorize Lift AI’s Connection to your Google Account
Regardless of GA4 or GA3, the first step is to authorize Lift AI to connect to your Google account.
Authorization is done automatically if you have used Lift AI’s Install Wizard on our Website.
If you did not use the installation wizard, you can authorize our application by adding analytics@marketlinc.com as a user to your GA account. Please ensure you authorize us for the views that you consider your primary view for measuring your business.
Step 2: Create the Lift AI Events
A) Lift AI Score
The first event that will be created is the Lift AI Score Event. The Lift AI application will automatically create this event once authorization is given.
We do this using the following snippet of code.
gtag("event", "Lift AI Score",{
"lai_intent" : <"High/Mid/Low Intent">,
"lai_score" : <"vs_conv_ai Cookie Value">
});
This snippet will create an event named: Lift AI Score. This event will have the following custom parameters associated with it:
LAI_Intent: Gives you a high level view of visitor intent < High, Mid or Low >.
This assumes that any visitor with a score of 60 or greater is high intent. Mid-intent is visitors with scores between 30 and 59. Low-intent visitors are visitors who scored 29 or lower.
LAI_Score: Contains the visitors’ more specific score band, enabling you to adjust what ranges you would like to use for High, Mid, or Low. The values would look like this: ex 0-4,5-9,10-14, 15-19, 20-24…
The two custom parameters mentioned above do not get reported automatically inside GA4 reports, we will have to store their values using custom dimensions.
B ) Lift AI Visitor ID
We also send Lift AI Visitor ID as a parameter to provide a primary key. This feature provides you with our unique visitor ID that can be used to map a visitor to other systems where your visitors may be engaged.
For example, if we pass the VID to your Chat Application, CRM, and Google Analytics, you can create a robust visitor history with the data across all three applications and see the intent score for visitors as they moved through your tech stack.
Step 3: Configure Custom Dimensions
In Google Analytics 4, go to Admin (click on the blue gear widget icon at the bottom left-hand side of the Google Analytics window) >> click on “Custom Definitions”.
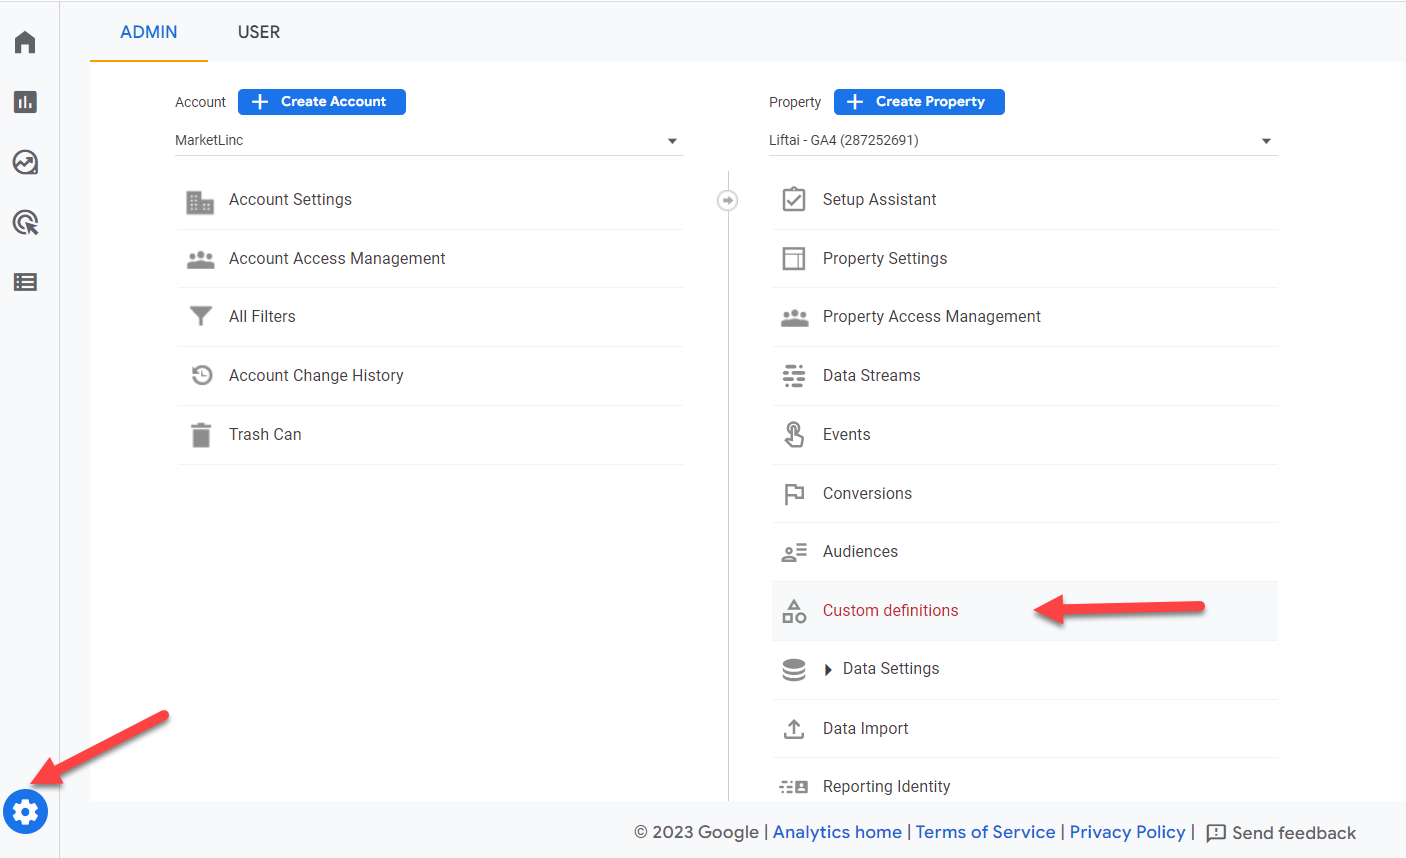
Please create two new custom dimensions as per the list below
- Name: Lift AI Score Range
Scope: Event scope
Value: Takes the value of "lai_score"
- Name: Lift AI Intent
Scope: Event scope
Value: Takes the value of "lai_intent"
- Name: Lift AI VisitorID
Scope: Event scope
Value: Takes the value of "lai_vid"
Click on “Create custom dimensions”
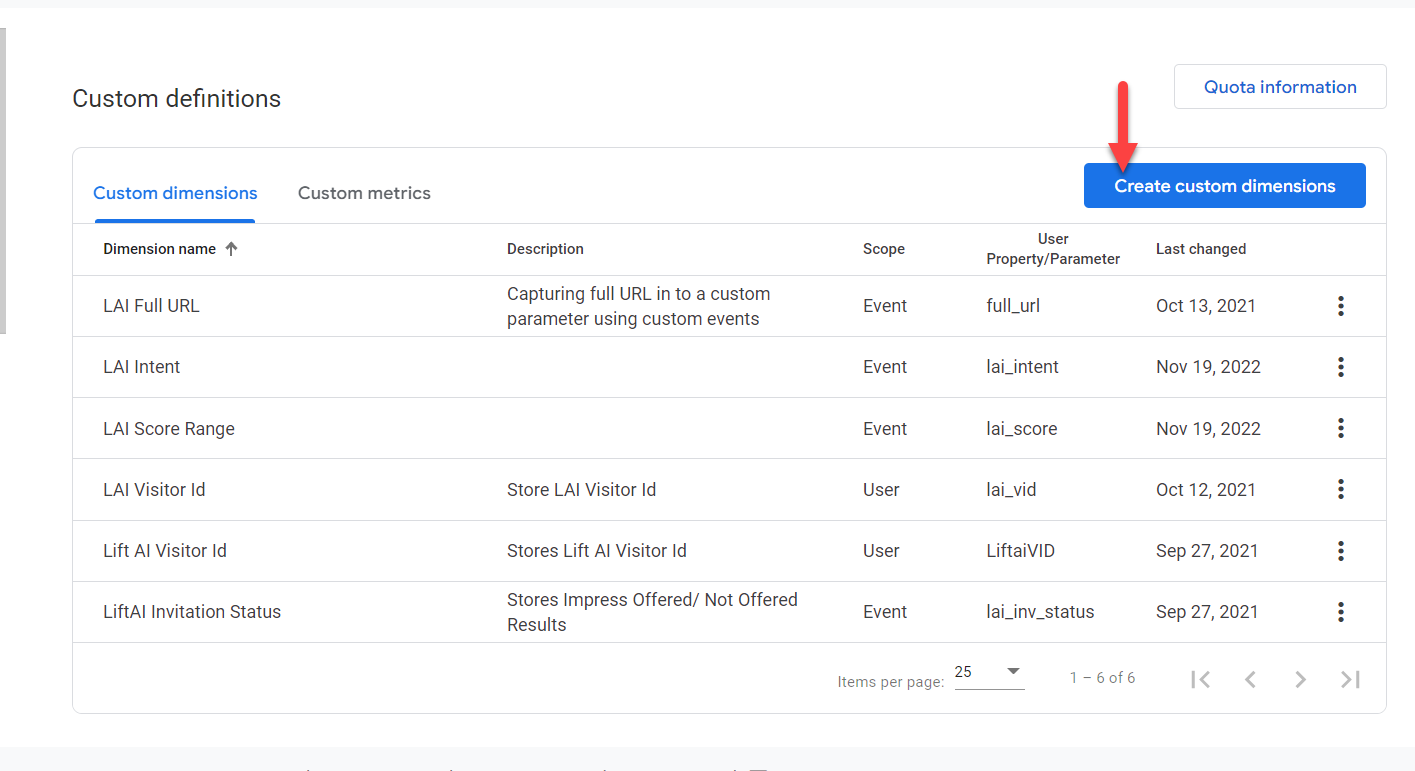
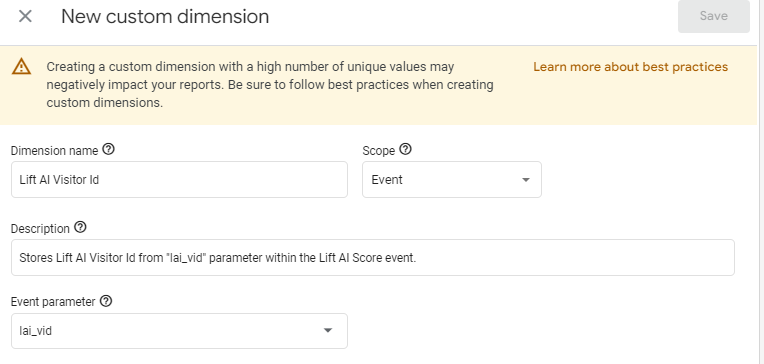
Within the New Custom Dimension window, enter the details as per the custom dimensions list given above. You can also choose a description for it to help you remember its purpose.
See the example screenshot below.

Similarly, set up the “Lift AI Visitor ID” custom dimension as per the details given in #3 above.
Step 4: Select a method to associate conversions with Lift AI
An important part of the integration is to see how well each visitor intent cohort is converting. This will enable you to validate how well the model is working and which conversions are coming from each cohort. For example, you can see if high-intent visitors are completing “Free trial start” or “Get Pricing” at a higher rate than mid or low-intent visitors.
In GA4, you need to determine which custom dimensions are considered conversions. Also, to report conversions associated with the Lift AI score custom dimension you will need to do some additional configuration.
There are a couple of methods to ensure that each conversion is attributed to a custom dimension. The preferred method may depend on the way you have implemented your conversions and the type of resources available to set this up.
Use the Explore Feature to create Lift AI Score Segments
For business users, our recommendation is to set up a new exploration for Lift AI that uses segments to view your data by Lift AI Cohorts.
A. Create a new exploration: Start by going to the explore icon and creating a new exploration.
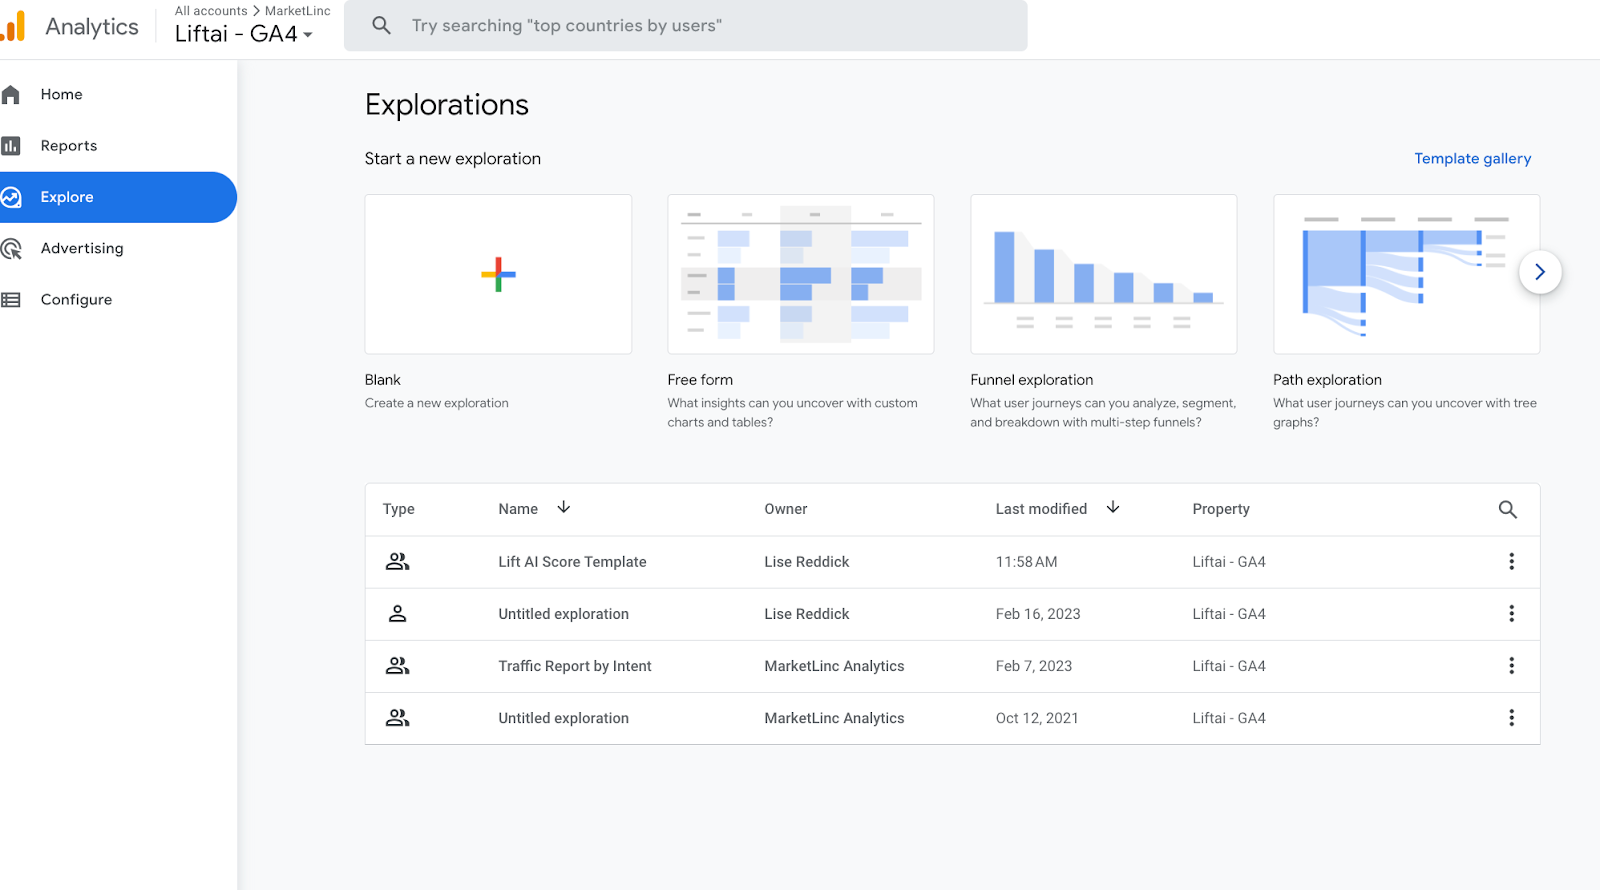
Note: If you have an existing exploration for which you have permission and room to add segments, you can skip creating an exploration and instead open an existing exploration.
B. Create Segments: Next, create the three segments that will give you the Lift AI Intent Cohorts
Within Explore, inside Variables, spot the “SEGMENTS” section, and click on plus sign “+” to start creating a new segment. This will open a window with the following three options to create segments.
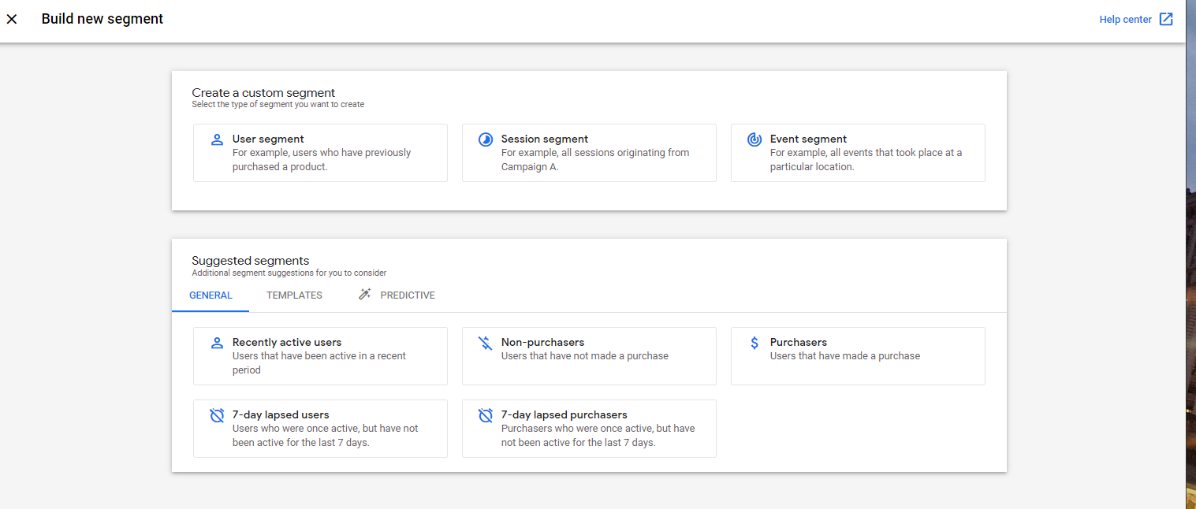
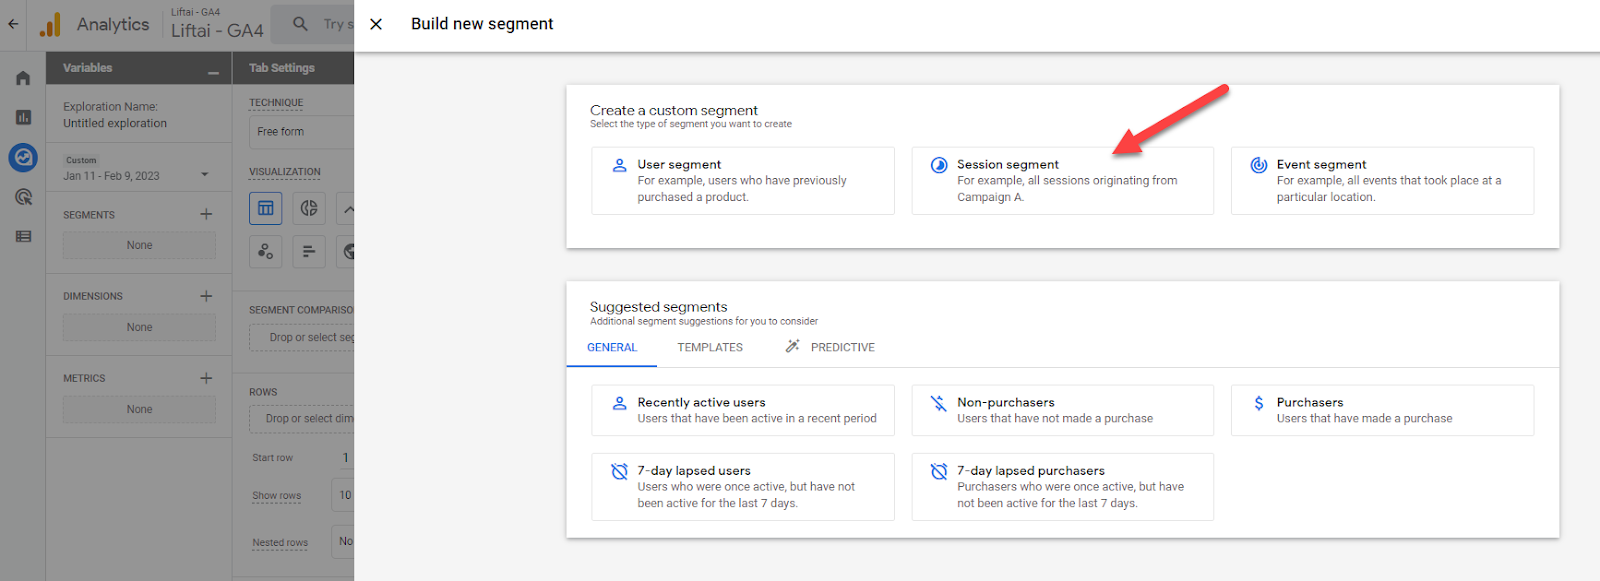
In this window, select “session segment” as we would want to analyze visits of the visitors.
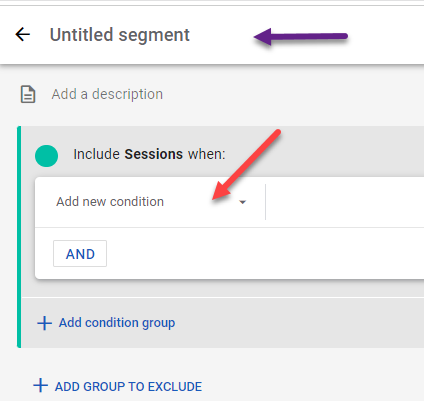
Next, add the conditions, enter the segment name, say “Lift AI Mid Intent” for example, then click on “Add New Condition”.
Select Events > Custom >> LAI Intent (Note that it is a custom dimension)

Then click on “Add Filter” which will allow us to select the condition and value.
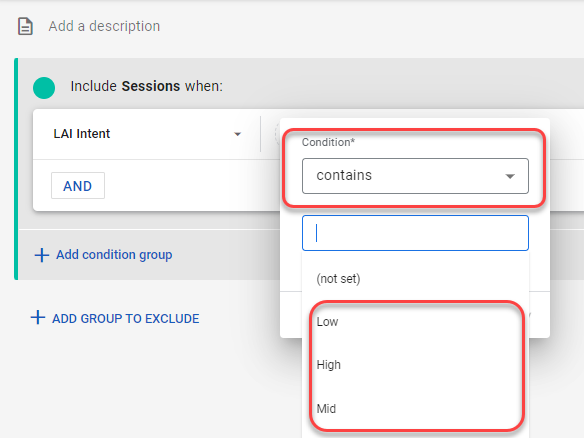
Choose one of the values for the desired intent segment (note that this a custom dimension - if you have just set up a custom dimension, wait for 24 hours so that GA starts populating data, otherwise you can manually enter the value for each segment we want to create “Low”, “Mid”, “High”.)
Once you are done, click on Save and apply at the top right corner of the window.
You will need to create three individual segments, so you will repeat this process three times to create segments named: Lift AI High Intent, Lift AI Mid Intent, and Lift AI Low Intent.
After you complete creating the segments, we can drag and drop the segments onto the Segments Comparison area in the Tab Settings pane. See the red arrow in the screenshot below.
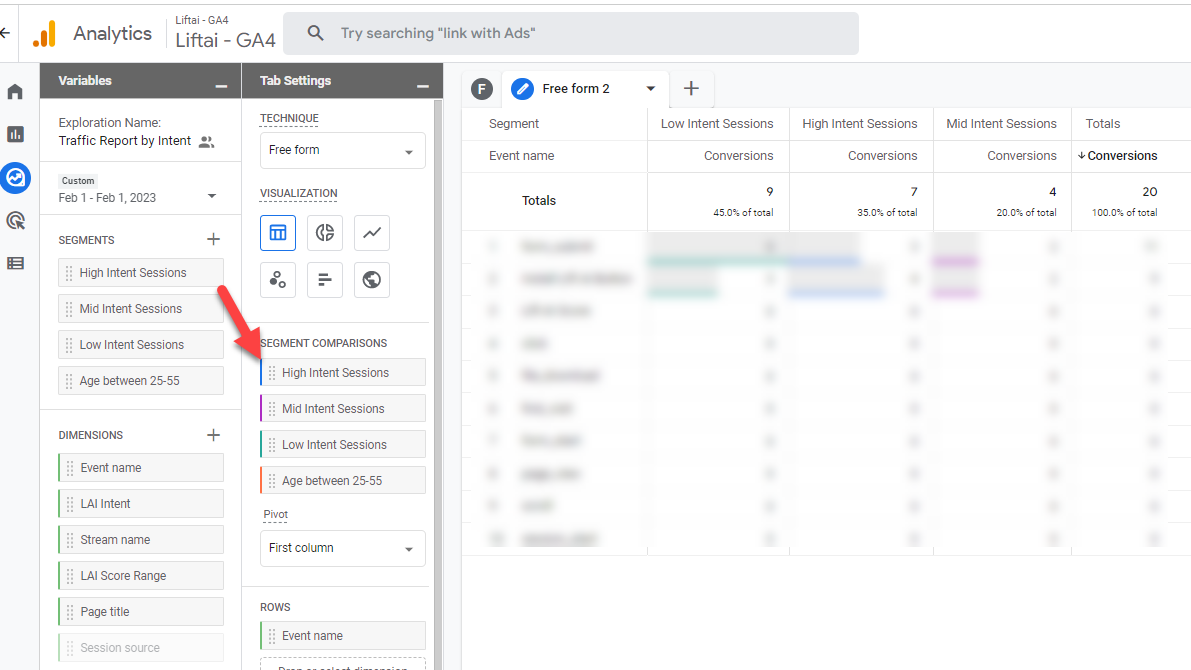
Once the segment is added, the next step is to complete your exploration. (Jump to exploration)
Adding Lift AI Parameters to your conversion events
To ensure accurate reporting and optimize the Lift AI model, it's important to connect our score events with your conversion events. To do this, you need to add the Lift AI parameters to your conversions (formerly known as goals). Please follow the instructions below:
Note: This process requires a more technical user with access to publish tags and code on your website.
Option 1: Using Google Tag Manager
If you use Google Tag Manager for the conversion event, follow these steps to edit the relevant tag and include the parameters:
- In Google Tag Manager, click on "Variables" in the left-hand side navigation menu
- Under the "User Defined Variables" section, click on "New" to create a new variable.
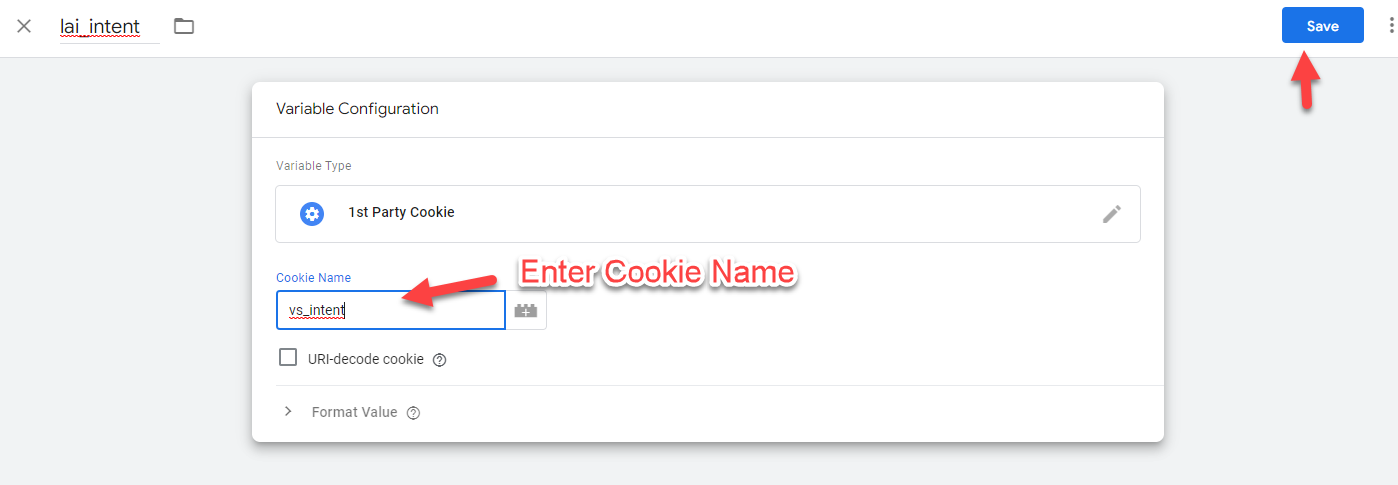
- Enter the Variable name "lai_intent" and select "1st Party Cookie" as the variable type.
- Set the cookie name as follows: "vs_intent."
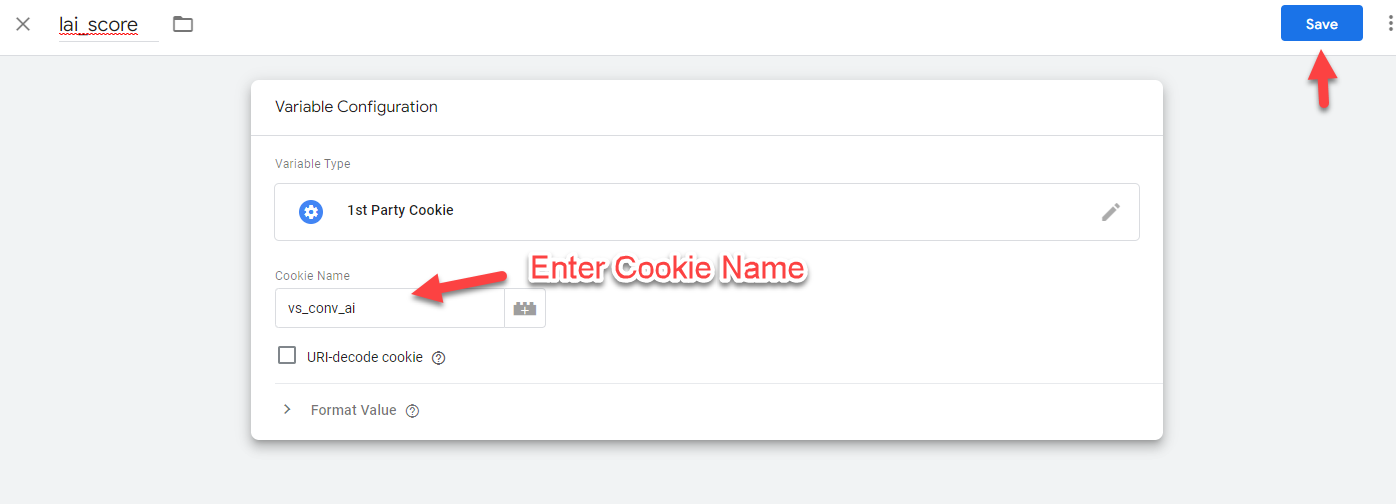
- Create another Variable name "lai_score" and select "1st Party Cookie" as the variable type
- Set the cookie name as followes "vs_conv_ai." - refer to the provided screenshots for a visual guide.
- Save each variable individually and publish changes in the workspace to push them to production.
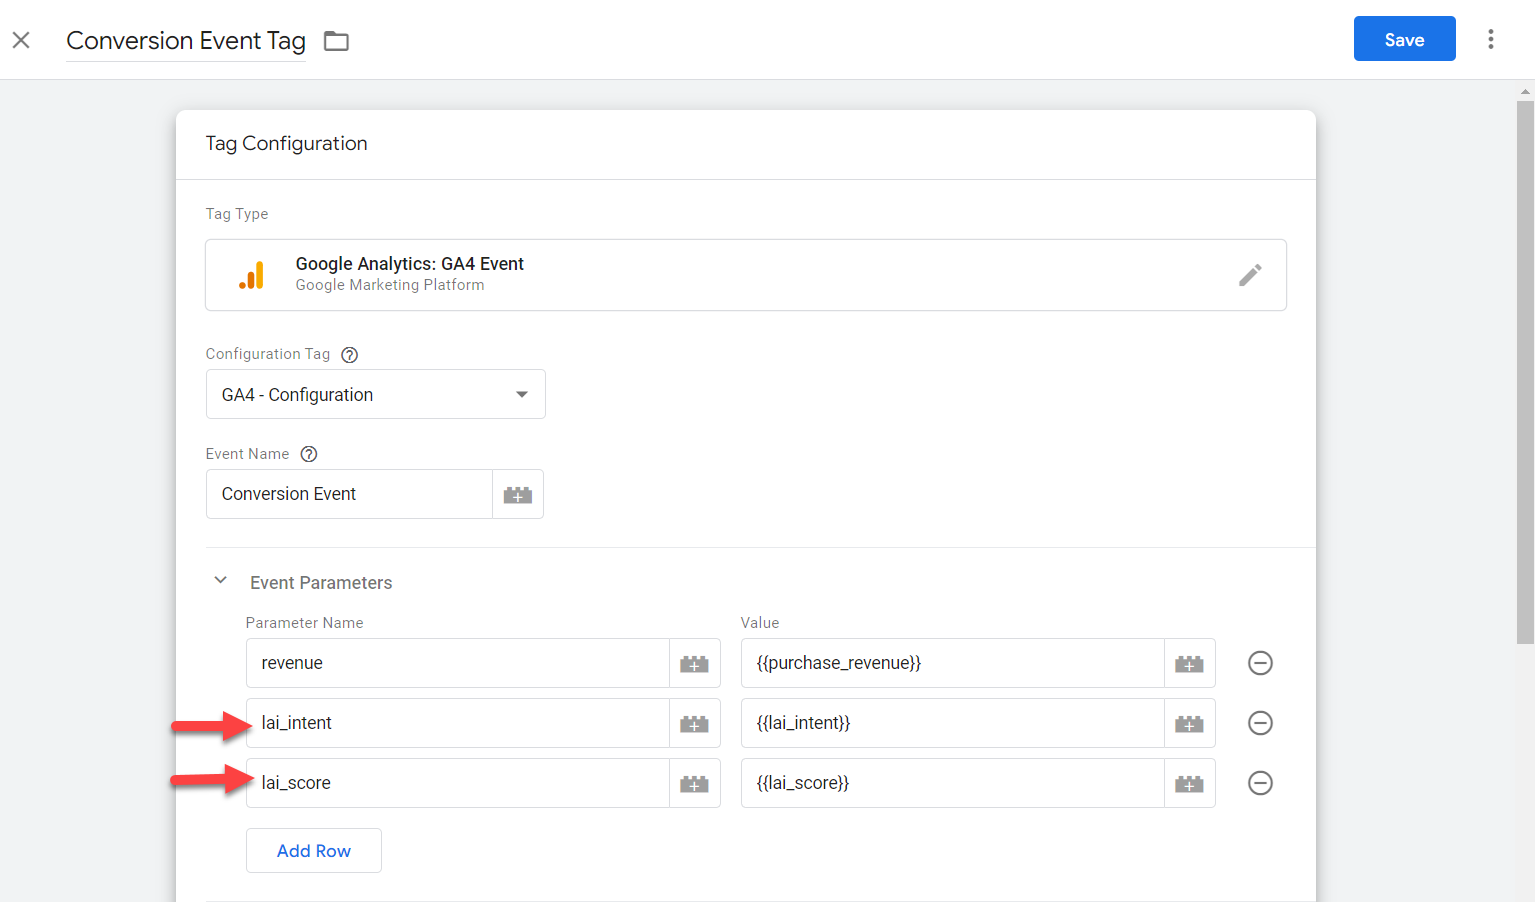
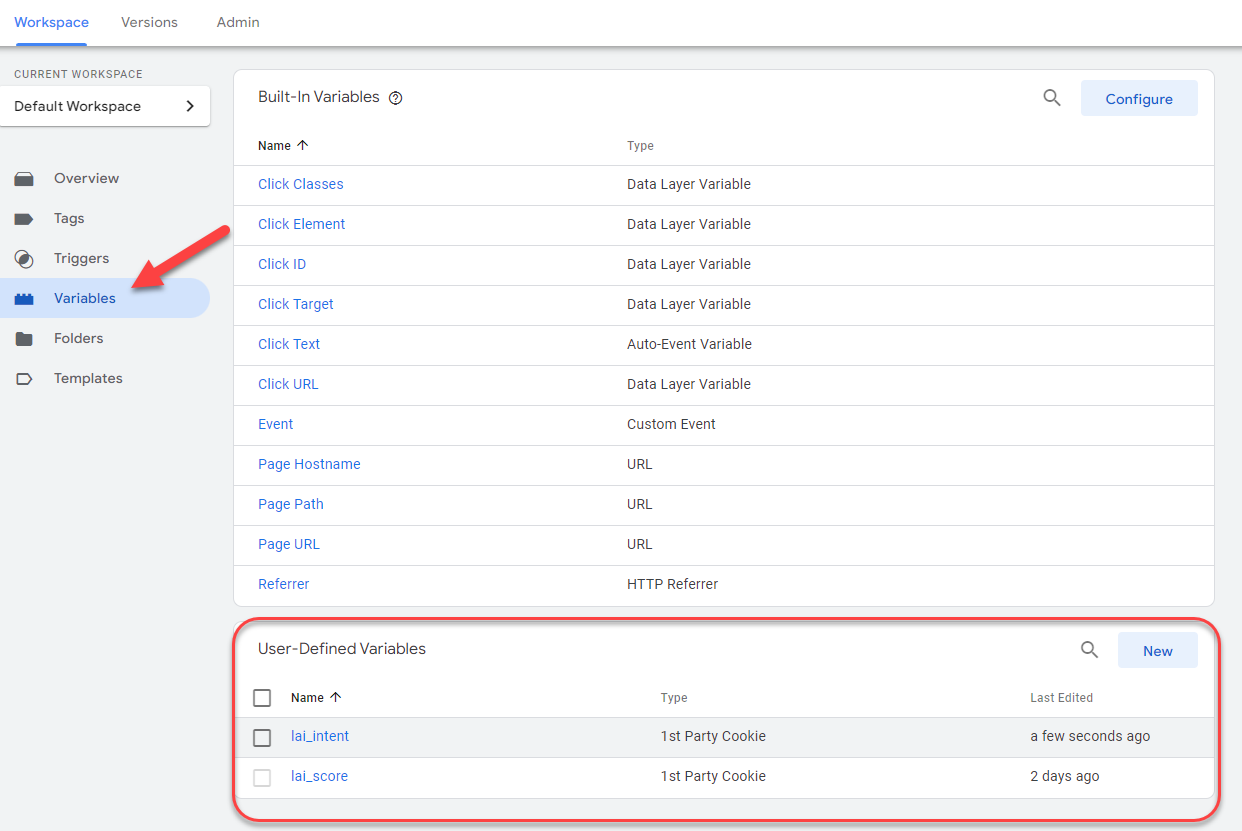
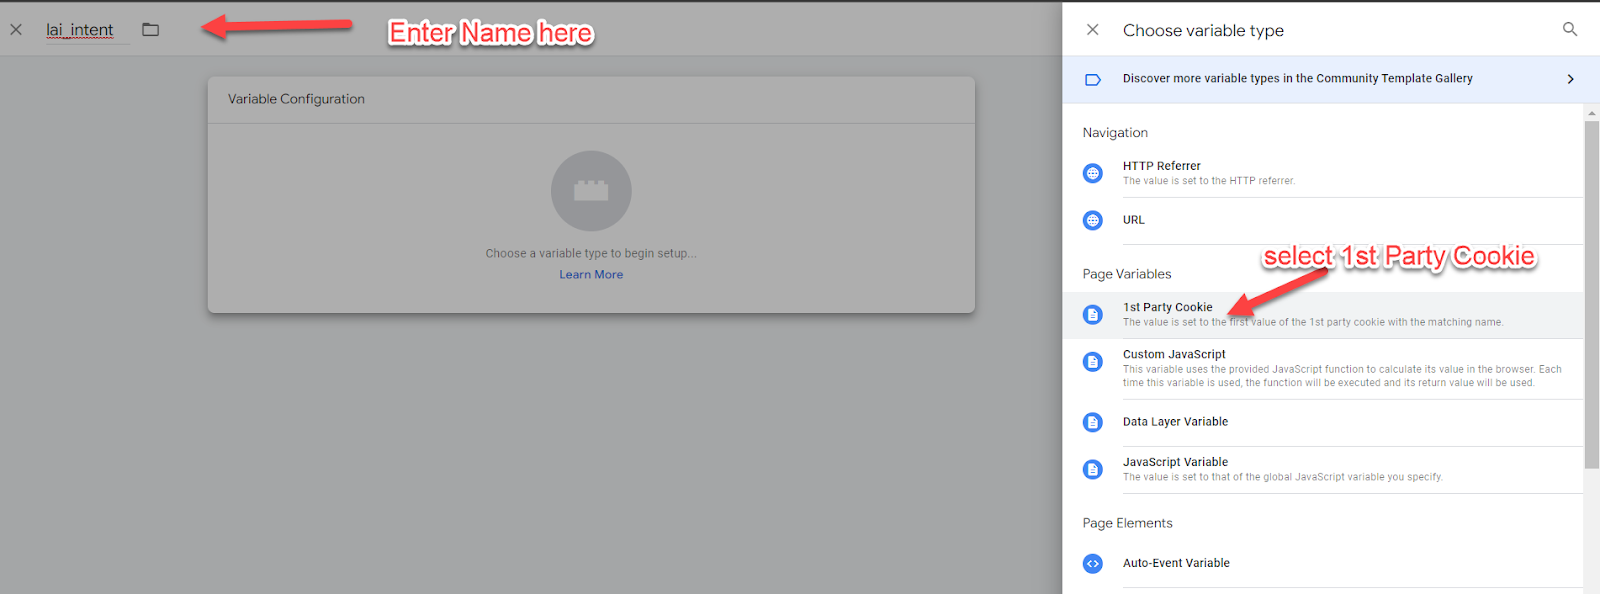
Option 2: For events that are hard coded on the website.
If your website has conversion tracking hard-coded, such as the purchase code shown below, include the "lai_intent" and "lai_score" as part of this event: (shown in code below).
Note that this should be done to any or all custom events that you capture on the website so as better analyze and segment the data based on user intent or user score.
gtag("event", "purchase", {
transaction_id: "T_12345_1",
value: 25.42,
tax: 4.90,
shipping: 5.99,
currency: "USD",
coupon: "SUMMER_SALE",
items: [
// If someone purchases more than one item,
// you can add those items to the items array
{
item_id: "SKU_12345",
price: 9.99,
quantity: 1
}],
"lai_intent": <’vs_intent’ cookie value>,
"lai_score": <’vs_conv_ai’ cookie value>,
"lai_vid": <’vs_vid’ cookie value>
});
Likewise, if you have other conversion events for events like “Products added to cart” or “File Downloaded” or “Contact Form” etc., including “lai_intent” and “lai_score” will help in analyzing and segmenting conversion data.
Step 5: Create your Exploration with Lift AI Segments
In this stage, you are essentially creating a report that you can reuse to view key metrics by Intent Cohorts. Essentially, you want to create views of the dimensions and metrics that will be helpful to you in understanding how different intent cohorts are responding to your pages, campaign, or your site overall.
To create a meaningful view, click the plus sign on Dimensions to add dimensions to your Exploration. Then choose the dimensions you want on the report and drag them into rows on the Tab Settings.

Next, add your metrics by clicking the plus sign above Metrics.. Then to add them to your report, drag the metric into the Values section on the Tab Settings.
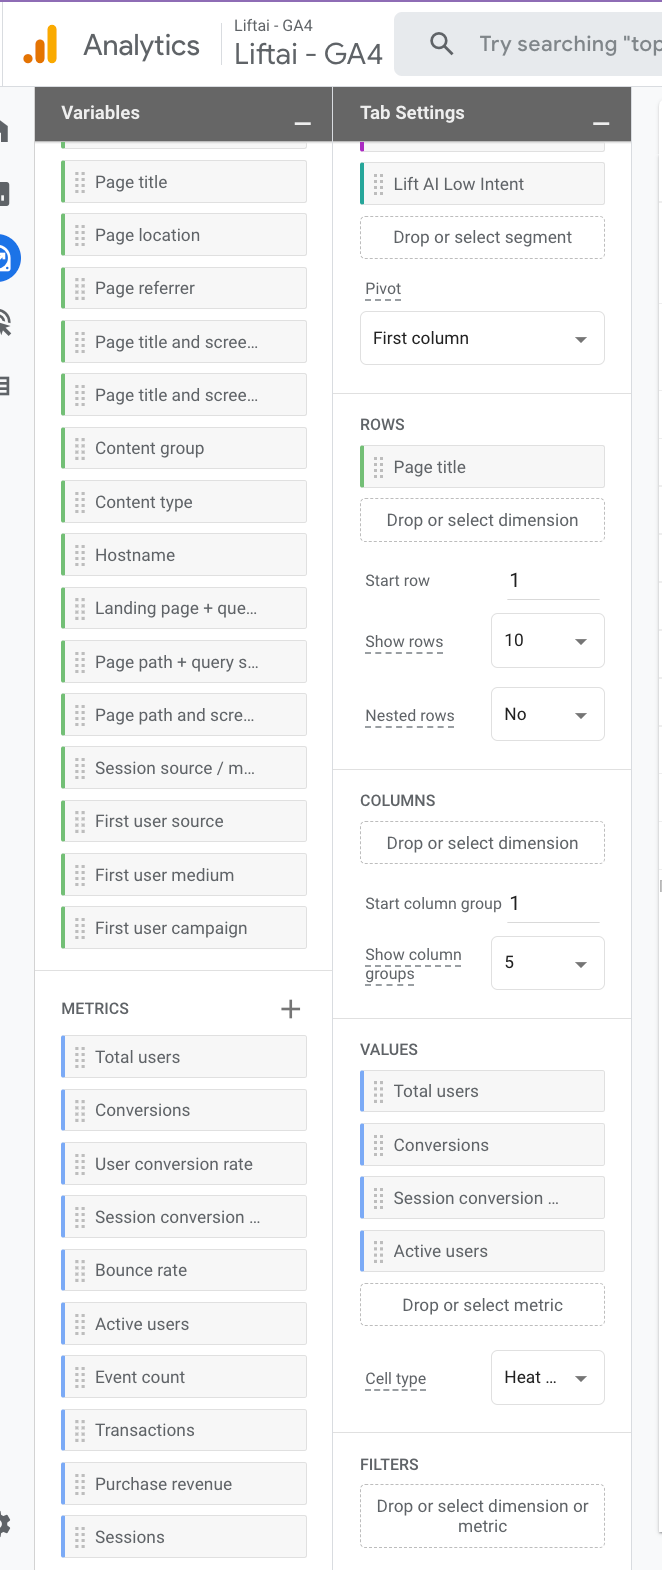
Lastly, add your Lift AI segments to the report by dragging your new segments to the Segment Comparisons section on the Tab Settings.
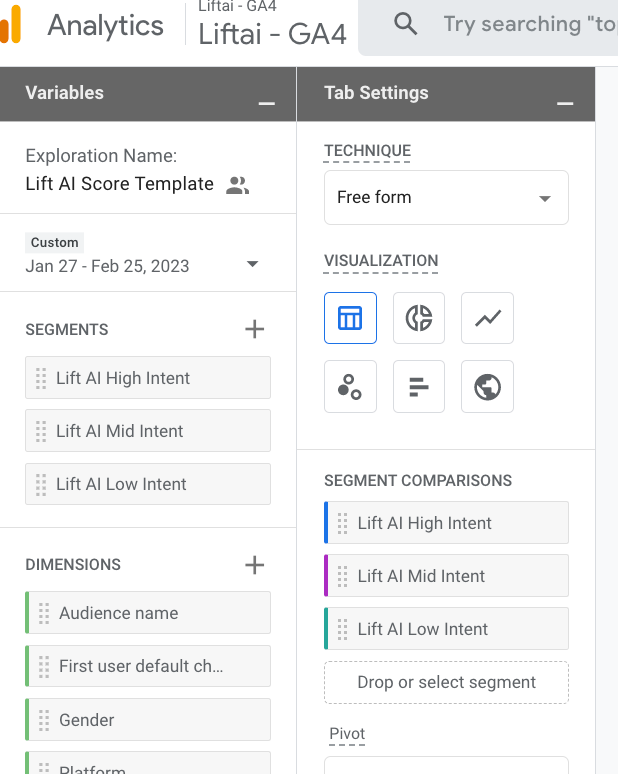
You can create multiple tabs and views by duplicating the tab and then switching dimensions or metrics.
Here are a couple of views that we found helpful:
Lift AI Intent Cohorts by Page

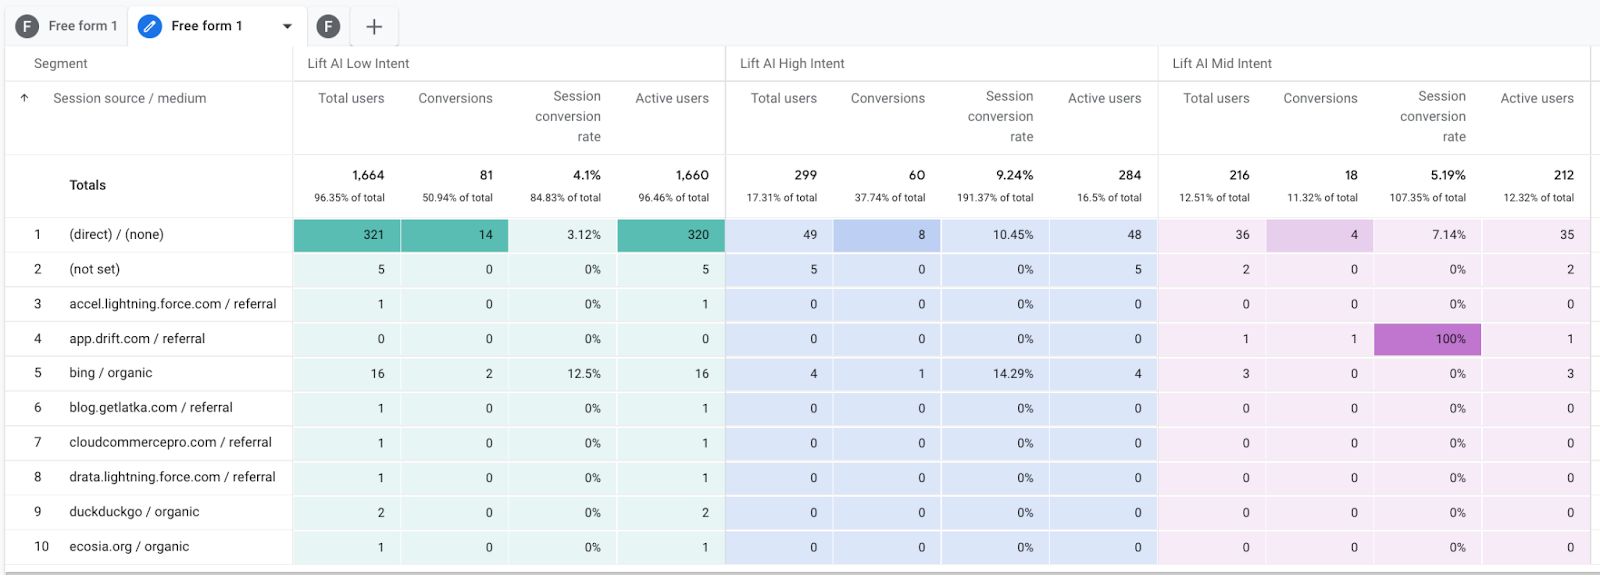
Lift AI Intent Cohorts by Source
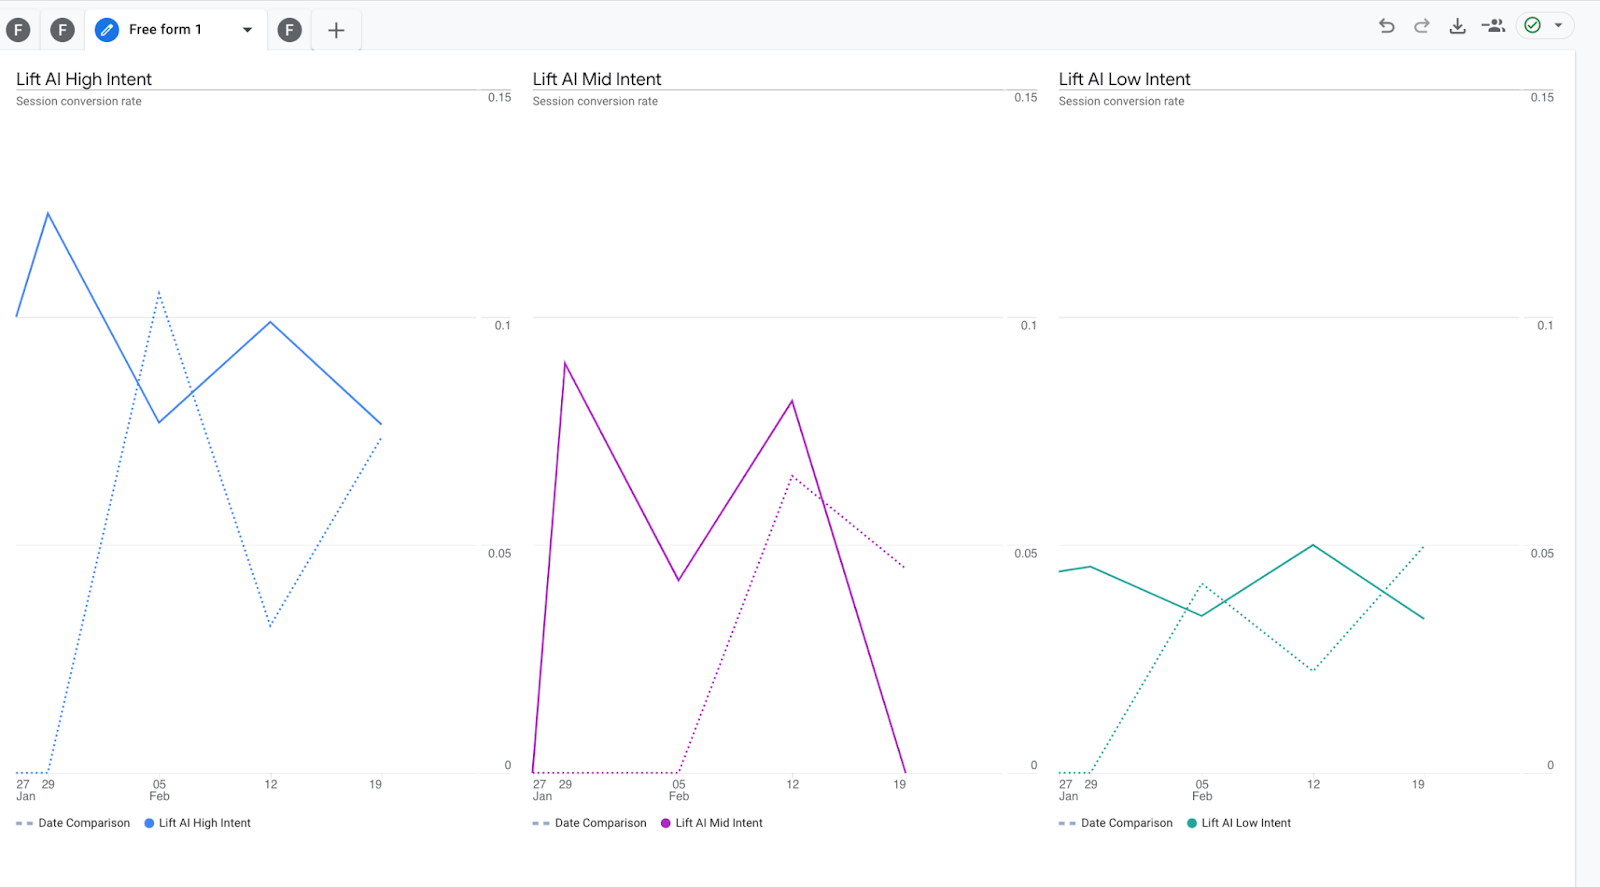
Lift AI Intent Cohorts with Date Comparison

Lift AI Intent Conversion Overtime Line Chart
Support
If you still need help regarding your GA3 or GA4 integration, please message our support team here.


